

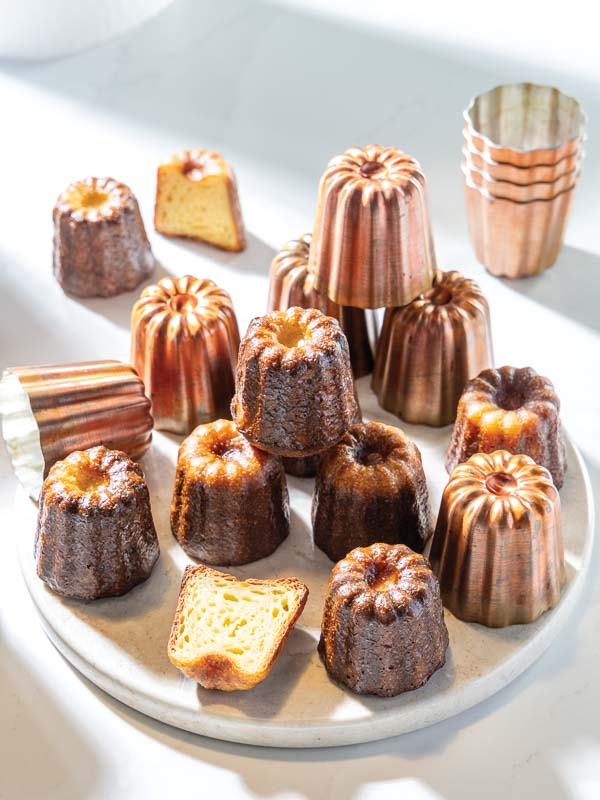
Originally known as cannelé Bordelaise, canelés (pronounced “can-uh-LAY”) are a unique pastry rooted in the winemaking region of Bordeaux in southern France. In the late 18th century, winemakers used egg whites to clarify their wines, resulting in a surplus of egg yolks. Historical accounts attribute the creation of canelés to resourceful nuns in the region, who cleverly crafted these pastries with leftover yolks blended with flour, milk, and sugar. Since Bordeaux is a port city, the recipe naturally evolved to include rum and vanilla, which beautifully enhances their flavor profile. Baked in small, fluted copper molds, these pastries developed a distinctive slightly chewy caramelized crust and a soft, custard-like interior. The name “canelé” comes from the French word for “fluted,” which describes the shape of the molds in which they’re baked.
Making canelés is often considered a bit challenging, but fear not! With our reliable recipe, you can confidently master the art of creating these irresistible pastries. If you have a love for baking and appreciate the beauty of simple, elegant pastries, this recipe is perfect for you.
Click here to download a printable PDF of this lesson!
Excellent recipes require wonderful ingredients. Here’s how our recipes’ ingredients contribute to making the best khachapuris.
WHOLE MILK: Whole milk makes up nearly 50% of canelé batter. Along with the egg yolks, it contributes to the canelés’ divine custardy flavor. Whole milk is cow’s milk that has not had any of its natural fat content removed. It typically contains 3.5% milk fat, making it rich, with a slightly thick consistency, perfect for baking. The milk solids caramelize beautifully thanks to the Maillard reaction, imparting wonderful flavor and color to the canelés.
VANILLA BEAN PASTE AND RUM: The fragrances of rum and vanilla are unmistakable when you bring a canelé to your lips. Vanilla bean paste lends a delightful speckled appearance and deepens the flavor profile. Combined with the warmth and complexity of rum, this classic pairing infuses the batter with an allure that is simply irresistible.
GRANULATED SUGAR: Granulated sugar plays a vital role in canelé batter, adding a necessary sweetness that wonderfully balances the rich flavors of milk, eggs, and butter. As it caramelizes during baking, it helps create that signature dark crust that defines a perfect canelé, enriching the flavor and adding delightful texture. Beyond sweetness and caramelization, sugar also helps retain moisture, contributing to the pastry’s custardy interior.
EGG YOLKS: Egg yolks contribute significantly to the canelé’s distinct custard flavor and smooth texture thanks in part to their magical emulsifying properties. Containing lecithin, a natural lipid, egg yolks help blend fats and liquids seamlessly. As the yolks coagulate when heated, their protein structure transforms, providing stability and allowing the canelé to maintain its shape. This intricate dance of gelatinization and coagulation creates that luscious center.
UNSALTED BUTTER: The moisture in butter is essential for that tender interior, as it evaporates during baking to produce steam, aiding in the rise of the pastry. The fats in butter not only add flavor but act as an emulsifier, aiding in blending the liquid and dry ingredients into a smooth batter that bakes evenly.
KOSHER SALT: Our salt of choice, kosher salt is a pure, mined, additive-free salt that dissolves readily and has a crisp, clean taste. It’s flaked rather than granulated, which allows for more-even distribution in each canelé.
ALL-PURPOSE FLOUR: All-purpose flour in canelés serves a few key purposes. It provides structure to the pastry, ensuring that it holds its shape during baking. The flour also contributes to the overall texture, helping to create the contrast between the crispy caramelized exterior and the soft interior.
BEESWAX AND CLARIFIED BUTTER: The blend of beeswax with clarified butter pays homage to the traditional methods established in Bordeaux, France. Clarifying butter involves melting butter, skimming off the whey protein foam on top, and carefully separating the pure fat from the milk solids, which settle to the bottom. When this mixture is melted and coated onto the molds, it creates a nonstick surface that allows the delicate canelés to release effortlessly after baking, which is important for achieving their distinctive caramelized crust. Beyond its practical benefits, beeswax brings a subtle, natural sweetness that enriches the overall sensory experience, enhancing the flavor profile of each bite.
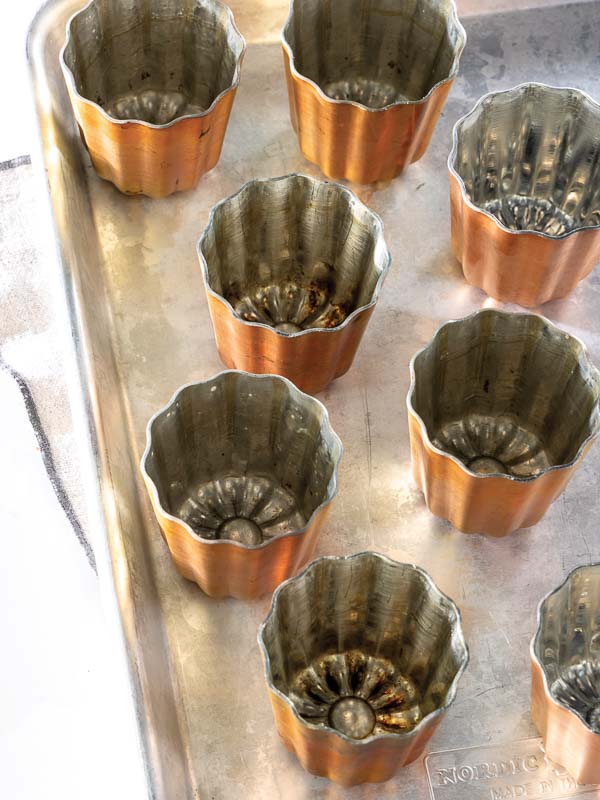 If your copper canelé molds are new, it’s essential to season them before baking with them. First, preheat your oven to 400°F (200°C). Next, wash your molds in warm, soapy water. Line a rimmed baking sheet with foil, and top it with a wire rack. Place your clean molds on another foil-lined rimmed baking sheet. In a microwave-safe liquid-measuring cup, heat 1⁄4 cup (57 grams) clarified unsalted butter and 1⁄4 cup (35 grams) beeswax pellets in 30-second intervals, stirring between each, until mixture is fluid and combined. Fill one mold to the top with the butter and beeswax mixture and then immediately pour it back into the measuring cup; return the mold to the baking sheet. Repeat with the remaining molds. Bake for 10 minutes. After baking, pour any excess beeswax mixture into the original measuring cup. Invert the molds onto the wire rack, and let them cool completely. Repeat the filling, baking, and draining process three more times to season the molds thoroughly. After you’ve seasoned the molds, avoid washing them; instead, wipe them clean as needed to maintain their seasoned surface.
The copper molds do not need a full seasoning process before each bake, but they do need a coating process as part of each bake for the canelés to achieve their signature dark, glossy sheen. A paper-thin layer of the same clarified butter and beeswax mixture enhances the exterior caramelization and texture of the canelés during baking.
In a small saucepan, heat milk and vanilla bean paste over medium-low heat, stirring frequently, just until bubbles form around sides of pan. (Do not boil.)
In a medium bowl, whisk together sugar, egg yolks, melted butter, and salt. Gradually add half of hot milk mixture, whisking constantly. Whisk in flour until smooth; whisk in remaining hot milk mixture. Whisk in rum. Strain batter through a fine-mesh sieve into an airtight container. Cover with plastic wrap, pressing wrap directly onto surface of batter to prevent a skin from forming. Cover with lid, and refrigerate for at least 48 hours or up to 4 days.
This resting period allows the flour to properly hydrate and the gluten to develop, which is essential for maintaining the shape of the canelés as they rise during baking. Additionally, the longer the batter rests, the more pronounced the flavors of rum and vanilla are in the finished canelés.
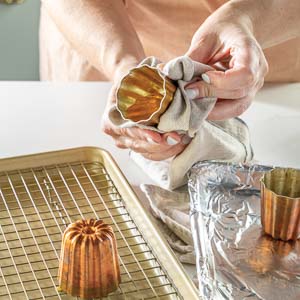
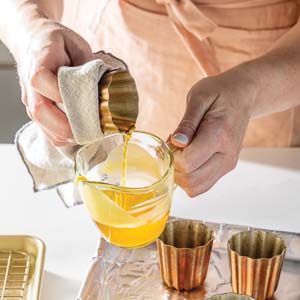
Preheat oven to 450°F (230°C). Line a rimmed baking sheet with foil. Place a wire rack on another rimmed baking sheet. On foil-lined pan, place 6 seasoned canelé molds, and preheat in oven for 5 to 10 minutes. Leave oven on.
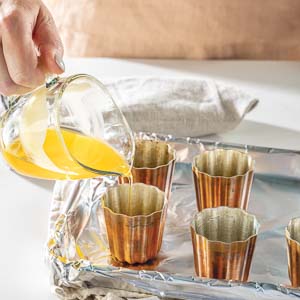
In a microwave-safe liquid-measuring cup, heat clarified butter and beeswax on high in 30-second intervals, stirring between each, until completely melted and combined.
Wearing heatproof gloves or using a cloth to protect your hands, fill 1 hot canelé mold halfway with beeswax mixture; swirl and coat entire inside, and pour excess mixture back into bowl. Place mold, upside down, on prepared rack, letting excess beeswax mixture drip from mold for 30 seconds to 1 minute. Repeat with remaining molds. Repeat procedure one more time with all molds. Let beeswax mixture harden at room temperature, or refrigerate for 10 to 15 minutes to speed up the process.
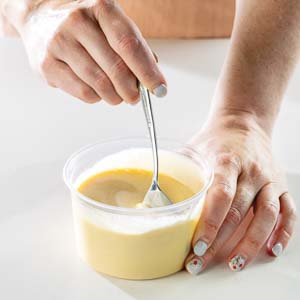
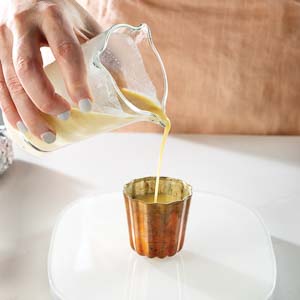
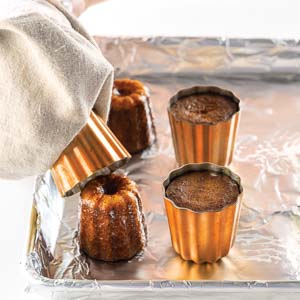
Gently stir batter with a spoon or silicone spatula to emulsify. (Do not whisk; you do not want to introduce more air.) On foil-lined prepared pan, divide batter among canelé molds, leaving about 3/8 inch of space at top to allow for rising. (In molds we used, it’s about 1⁄4 cup or 75 grams per mold.)
For more-consistent results when making canelés, use a kitchen scale to measure the batter instead of estimating. By weighing the batter, you ensure each mold gets the right amount of batter and you have more control over the process.
Bake for 20 minutes. Rotate pan, and reduce oven temperature to 350°F (180°C). Bake until top and outside of canelés are deep golden brown, 45 to 55 minutes more, rotating pan again after 20 minutes of baking. Carefully remove 1 canelé from mold; if it does not have a uniform color, return it to mold, and bake for 5 to 10 minutes more. Immediately invert canelés onto a wire rack, and let cool completely. Best served same day as made.
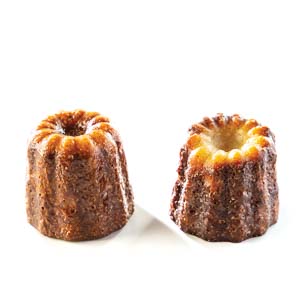 If your canelé has a “white bottom,” like the one on the right shown above, don’t worry! Here are some tips to help you prevent this and bake perfect canelés every time.
Make sure the butter-beeswax mixture in the bottom of your copper molds is a thin, even layer. A thick layer can prevent proper caramelization. Be careful not to mix too much air into the batter, which can cause the canelés to rise too much; they should puff slightly but not rise high. Additionally, avoid overfilling the molds, and make sure you bake them for long enough. These tips will help you achieve a beautifully caramelized exterior with a soft interior.
The post Baking School In-Depth: Canelés first appeared on Bake from Scratch.