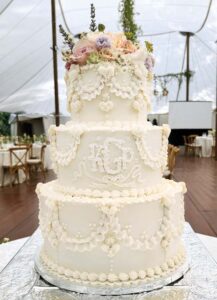
This wedding cake was born out of friendship and thoughtful collaboration between the bride and her family and editor-in-chief Brian Hart Hoffman and the Bake from Scratch team—built on shared moments, trust, and a genuine love for creating something beautiful together.
When Kelsey Phinney first met editor-in-chief Brian Hart Hoffman at the Bake from Scratch Paris baking retreat in 2021, little did she know that the Bake from Scratch team would become central to one of the most memorable moments of her wedding day. “I had such a great time with my mom at that retreat,” Kelsey recalls. “So, when she asked me to join her in Birmingham, Alabama, for the 2022 holiday retreat, I was all in. That’s when everything changed.”
It was during that retreat, as Kelsey and her mom, Tammy, caught up with Brian and test kitchen director Laura Crandall, that the idea of a wedding cake came up. Kelsey had just gotten engaged, and as they baked, Brian—always full of enthusiasm—asked about her wedding plans. “He was one of the first people I showed my dress to,” Kelsey says with a laugh.
But they talked most about the cake. When Brian asked her who would be making it, she said she hadn’t thought about it yet. Kelsey recalls, “Without hesitation, Brian said, ‘We’ll do it!’ I thought maybe he’d had one too many mimosas or got carried away. But he meant it! I couldn’t believe it.”
Tammy reflects on the deeper connection they’d built with the Bake from Scratch team. “I met Brian at the very first retreat, in San Francisco in 2019. The 2024 Holiday Baking retreat was my eighth or ninth retreat, so we’ve really become family.” She describes how Brian and Laura were not just making a cake but creating something deeply personal for Kelsey and her fiancé. “When they started working on the design, they asked Kelsey to share every detail of the wedding—colors, theme, flowers—so they could make the cake truly representative of her.”

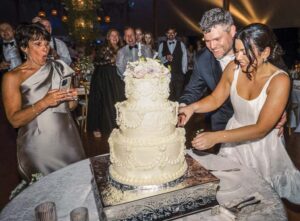
On the day of the wedding, Laura and baking and pastry editor Katie Moon Dickerson arrived in Charlottesville, Virginia, to assemble the cake. “They were working in the tiniest kitchen in the guesthouse,” Kelsey says with a laugh, “and with the groomsmen running around! But they did it— and it was absolutely stunning.”
For Kelsey, the cake was more than just a dessert—it was a lasting symbol of the bonds she has forged with the Bake from Scratch team and the love and care they had poured into every detail. “I’ll always be grateful to Brian and the team for making it happen. It was the most magical cake, and I’ll treasure the memory forever.”
Click here to download a printable PDF of this lesson! Be sure to join us for Baking School with Williams Sonoma on Monday, March 31, 2025, at 5 p.m. PT. Brian Hart Hoffman, Laura Crandall, and Katie Moon Dickerson will be sharing their expert tips and techniques to help you create your perfect tiered wedding cake. Don’t miss this opportunity to bring your dream cake to life! Register here.
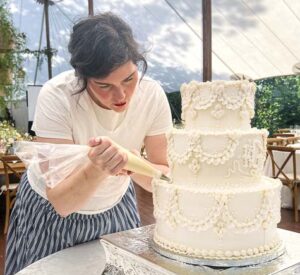
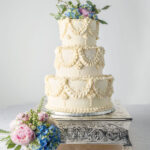
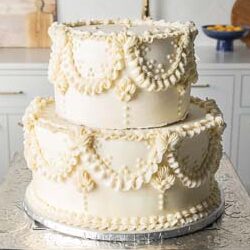
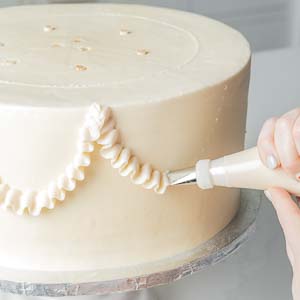
The style of decorative piping used on this cake is called the Lambeth method, also known as Victorian piping or English overpiping. This ornate, highly decorative technique, traditionally crafted with royal icing, is having quite the revival. And with its timeless yet modern appeal, it’s easy to see why.
While “Lambeth” is a household name among cake decorators today, for those not in the know, it’s named after Joseph Lambeth, an American decorator who perfected this intricate art form throughout the 1920s and 1930s. Everything about the symmetrical patterns and bold flourishes was designed to captivate, much like the grand, ornate rooms and opulent architecture of the Victorian era. Think gilded salons and lavish palaces, where excess wasn’t just accepted but expected.
Excellent recipes require wonderful ingredients. Here’s how our recipes’ ingredients contribute to making this divine wedding cake.
UNSALTED BUTTER: Butter contributes fat for tenderness and flavor while also assisting in aeration when creamed with sugar. In cake batter, its semisolid nature allows it to trap air, which expands during baking, contributing to a lighter texture. In buttercream, its emulsifying properties create a smooth and stable frosting.
GRANULATED SUGAR: Sugar is more than just sweetness—it impacts structure and texture. It binds water molecules, reducing gluten formation for a more tender crumb. It also assists in aeration during creaming, helping to incorporate air pockets that contribute to the cake’s rise.
NEUTRAL OIL: Oil provides moisture and prevents the cake from feeling dry. Unlike butter, oil remains liquid at room temperature, lending a softer texture and prolonging the cake’s freshness.
EGG WHITES: Egg whites provide structure due to their protein content, which coagulates when heated, giving the cake stability. Without egg yolks, the cake has a finer, tighter crumb and a lighter texture. Since yolks contain fat, removing them slightly reduces richness, but the inclusion of sour cream and oil counterbalances this effect. The absence of egg yolks also helps keep the cake white, as the yolks’ yellow pigment would otherwise contribute to a more off-white color.
VANILLA EXTRACT: Vanilla enhances flavor complexity, adding warmth and aromatic depth to the cake. It also has alcohol, which can help distribute flavors more effectively throughout the batter.
ALL-PURPOSE FLOUR: Flour provides the primary structure of the cake through gluten development. The balance between flour, fat, and sugar determines the final texture—too much flour leads to toughness, while too little results in collapse.
BAKING POWDER: A chemical leavening agent, baking powder releases carbon dioxide gas when mixed with liquid and exposed to heat. This expands the air pockets created during creaming, causing the cake to rise. If double-acting, it releases gas both when mixed and when baked, ensuring an even rise.
KOSHER SALT: Salt enhances flavor by balancing sweetness and intensifying other taste perceptions. It also strengthens the gluten network slightly, improving texture.
WHOLE MILK: The balance of water, fat, and proteins influences structure and tenderness. Water hydrates the flour, allowing gluten to form, while milk proteins contribute to a fine crumb. The fat content helps create a softer texture, and
the natural sugars promote gentle caramelization for a golden crust. Room temperature is key—it blends more seamlessly into the batter, preventing curdling and ensuring even distribution of fat.
SOUR CREAM: The acidity from sour cream weakens gluten development, leading to a more delicate, tender cake. Second, it reacts with baking powder to create carbon dioxide, giving the batter an extra lift. The fat content contributes richness, and the tang subtly balances the cake’s sweetness.
CONFECTIONERS’ SUGAR: Unlike granulated sugar, which has large, sharp crystals, confectioners’ sugar is ground into a fine powder, often mixed with a small amount of cornstarch (around 3%) to prevent clumping. This ultra-fine texture means it dissolves effortlessly into buttercream, creating that silky-smooth finish. In frostings, it stabilizes fat and air, making sure everything holds its shape. The cornstarch also absorbs excess moisture, keeping buttercream from weeping or becoming grainy over time.
HEAVY WHIPPING CREAM: Heavy whipping cream is mostly butterfat (at least 36%), which means it brings luxurious richness to buttercream and an airy, cloudlike lightness to the strawberry filling. When whipped, the fat traps air, creating a structure that’s both stable and melt-in-your-mouth soft.
PURPLE LIQUID FOOD COLORING: Butter has a natural yellow hue thanks to beta-carotene in the milk fat. When you want a pristine white frosting, a tiny drop of purple food coloring neutralizes that yellow tint. This works because yellow and purple sit opposite each other on the color wheel—together, they create a neutral white instead of a warm, buttery yellow. The key? A microscopic amount. Too much, and suddenly your wedding cake frosting has a lilac undertone.
WATER: In the Vanilla Simple Syrup, water acts as a universal solvent, dissolving sugar to create a liquid that seeps into the cake layers, keeping them moist without making them soggy. It also plays a role in caramelization—when sugar and water heat up together, the water slows the browning process, allowing for even cooking. In the cake batter, the water content in milk and eggs controls gluten formation and starch gelatinization, both essential for structure.
FRESH STRAWBERRIES: Strawberries are around 90% water, which makes them a tricky ingredient in fillings—too much liquid and you risk a runny consistency. Roasting them solves this, evaporating excess water while concentrating natural sugars and deepening their flavor. Strawberries are also naturally acidic, which enhances the overall balance of the cake. The softening of pectin during roasting gives the filling a luscious texture, and the fruit’s bright tartness cuts through the richness of butter and cream.
CREAM CHEESE: Unlike butter, which is nearly pure fat, cream cheese contains about 55% water. This high moisture content gives frostings and fillings a smooth, spreadable consistency while also offering structure and stability. The acidity plays well with sugar, keeping the filling from becoming too sweet, and the tanginess enhances the flavor of the strawberries.
VANILLA WHITE CAKE: The foundation of this cake is a light and fluffy yet sturdy vanilla white cake. The recipe is flexible and can be scaled to create three distinct tiers—6-, 9-, and 12-inch cakes—plus a 13×9-inch sheet cake for extra servings, which makes it an ideal choice for both grand wedding cakes and more intimate gatherings.
VANILLA SIMPLE SYRUP: Soaking the cake layers in simple syrup is the secret to keeping the cake moist and flavorful. Infused with vanilla, the syrup elevates the subtle flavor of the cake and adds a gentle sweetness without overwhelming the palate.
STRAWBERRY CREAM FILLING: Fresh strawberries are roasted to intensify their flavor and then blended with a fluffy mixture of cream cheese and heavy whipping cream. The filling is light yet luxurious, offering the perfect balance to the vanilla cake and buttercream.
VANILLA AMERICAN BUTTERCREAM: This smooth, creamy buttercream is the perfect foil to the strawberries. Its buttery richness provides a lush texture that melts in your mouth. The addition of heavy cream gives the buttercream a soft, velvety consistency, making it easy to work with and perfect for creating smooth layers and beautiful decorations.
Here are a few kitchen essentials that will help you create a cake worthy of any celebration. 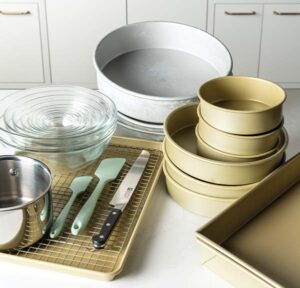
 ROUND PANS: Round pans—typically 6-inch, 9-inch, and 12-inch—are the perfect trio for creating a classic tiered cake. These sizes allow you to build height and dimension, ensuring each layer is beautifully proportioned. With them, you can achieve a striking visual balance while serving differing numbers of guests. (Pictured: Williams Sonoma Goldtouch® Pro Nonstick Round Cake Pan in 6-inch, Williams Sonoma Goldtouch® Pro Nonstick Round Cake Pan in 9-inch, Fat Daddio’s Anodized Aluminum Round Cake Pan in 12×3-inch.)
RECTANGULAR BAKING PAN: A rectangular baking pan is essential for baking sheet cakes, which are perfect for serving larger crowds and can be decorated with the same elegance as tiered cakes. (Pictured: Williams Sonoma Goldtouch® Pro Nonstick Rectangular Cake Pan.)
SERRATED KNIFE: A serrated knife is your best friend when it comes to leveling cakes. Unlike a straight-edged knife, the serrated blade will help you cut through the sponge without disturbing the delicate crumb. Use it to trim off the tops of your layers so they sit evenly, ensuring each tier is perfectly level and ready for frosting. (Pictured: Zwilling Pro Bread Knife with Z15 Serration, 9 ”.)
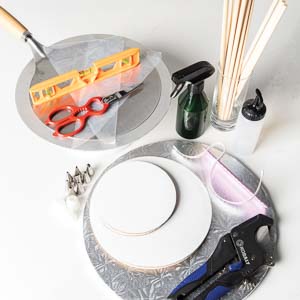
CAKE BOARD: Each tier of the cake should be placed on its own cake board to ensure both structure and stability. Use appropriately sized greaseproof or plastic boards to match the dimensions of your tiers. If you choose greaseproof boards, tape two together with the greaseproof sides facing out to prevent moisture from the cake from weakening the board’s structure. These boards are essential for easy handling and transferring of layers and to keep the assembled cake stable and prevent it from shifting or collapsing as you stack and decorate.
CAKE TURNTABLE: A cake turntable is key for smooth, even piping and frosting. As you work with your buttercream, a turntable allows you to rotate the cake effortlessly, ensuring a flawless finish all the way around. This tool is a must for getting crisp, clean edges on your tiers and makes decorating a lot easier by giving you full 360-degree access.
WOODEN DOWELS: Wooden dowels provide support to your stacked tiers and keep them from falling over. Once you’ve assembled each tier, insert these dowels into each except for the topmost tier. The 12-inch wooden dowels are long enough to give your cake the strength it needs, and they can be cut to size to perfectly fit each tier using a PVC pipe cutter.
CAKE LIFTER: A cake lifter is particularly helpful when working with larger or tiered cakes, allowing you to lift and transfer your creations without worrying about damaging them. A sturdy cake mover will help you slide the cake off the turntable and onto your final cake plate or display stand with ease. (Pictured: Nordic Ware Cake Lifter.)
SQUEEZE BOTTLE: With a squeeze bottle, you can drizzle a thin, consistent layer of Vanilla Simple Syrup onto the cake layers, allowing them to absorb the liquid without oversaturating any areas. It’s far more precise than using a spoon or pouring directly, giving you the freedom to work in small, controlled amounts. This ensures the cake stays moist—not wet—with just the right balance of flavor and texture. (Pictured: OXO Good Grips Chef’s Squeeze Bottle-Medium.)
OFFSET SPATULAS: A large offset spatula is your go-to for spreading buttercream onto your cake. The long, offset blade allows you to glide on the surface with control, ensuring an even and smooth layer of frosting. A small offset spatula is ideal for adding fine details to your cake, especially around the edges, or for working in tight spaces between tiers. (Williams Sonoma Olivewood Offset Icing Spatula.)
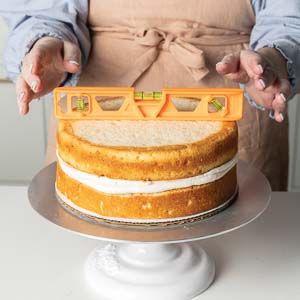
LEVEL: Using a level when making a wedding cake is essential for ensuring each tier sits perfectly straight. It’s a small but crucial step that guarantees your tiers align beautifully and your cake stays steady, no matter how many layers it has. (9 Inch Level.)
SPRAY BOTTLE: Lightly misting the cake with water from a spray bottle before a finishing pass with a small offset spatula or bench scraper helps to even out the consistency of the buttercream and create a smooth, polished exterior. (Glass Spray Bottle.)
ARC RULER: An arc ruler helps you pipe symmetrical curves and delicate borders with ease. It’s especially useful for wedding cakes, where uniformity and elegance are essential, allowing each design element to flow seamlessly across the tiers. (Pictured: Fondant Cake Arc Ruler.)
PASTRY BAG/PIPING COUPLER: A sturdy pastry bag is indispensable for all your piping work. The flexible material allows you to squeeze with ease and precision, and it can be fitted with different piping tips to create a range of beautiful designs. And switching between tips is easy with the help of a piping coupler, which allows you to change designs without needing to swap out your bag.
GLASS NESTING BOWLS: Glass is nonreactive, meaning it won’t interfere with the chemical composition of ingredients like eggs, dairy, or acidic components. The transparency of glass also allows for easy monitoring of mixtures. Nesting bowls help with mise en place, ensuring all ingredients are measured and ready, which is crucial in precise baking. (Pictured: Glass Mixing Bowl 10-Piece Set.)
RIMMED BAKING SHEET WITH WIRE RACK: The rimmed baking sheet prevents spills when roasting strawberries, and the wire rack ensures even air circulation for cooling cakes. Heat transfer is optimized, preventing sogginess and allowing excess moisture to escape, which is critical for maintaining a cake’s structure. (Pictured: Williams Sonoma Goldtouch® Pro Nonstick Non Corrugated Half Sheet with Cooling Rack.)
SILICONE SPATULAS: Silicone is heat-resistant and flexible, making it ideal for scraping bowls efficiently, ensuring no ingredient is wasted. (Pictured: Get It Right Ultimate Spatula in Mint, Get It Right Mini Spatula in Mint.)
KITCHEN SHEARS: High-quality shears allow precise trimming of parchment paper for lining pans and of pastry bags, ensuring clean, controlled cuts. (Pictured: Zwilling Multi-Purpose Kitchen Shears.)
PVC PIPE CUTTER: A must-have for precise, clean cuts on wooden dowels used to support tiered cakes, this tool ensures stability by allowing you to trim dowels to the exact height needed, preventing uneven stacking and structural issues. (PVC Cutter.)
SAUCEPAN: A saucepan provides controlled heat distribution for making Vanilla Simple Syrup. The gradual heating process ensures even sugar dissolution, preventing crystallization and allowing the syrup to penetrate cake layers effectively for added moisture. (Williams Sonoma Signature Thermo-CladTM Stainless-Steel Saucepan.)
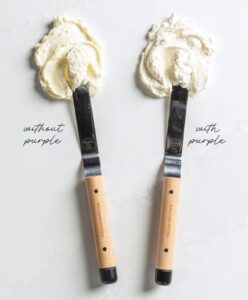 Butter’s natural yellow hue comes from beta-carotene, a pigment found in the grasses and plants cows eat. This beta- carotene gets absorbed into the milk and transferred into the butterfat during the churning process. But when you’re whipping up buttercream and aiming for a pristine white finish, the natural yellow tint of butter can be a bit of a nuisance. Here’s where a little food coloring works magic. It might sound counterintuitive to add a color that’s technically opposite to yellow, but a tiny drop of purple works wonders. It helps cancel out those warm yellow tones, leaving you with a clean, neutral white—perfect for wedding cakes or any confection that requires a flawless, elegant finish.
The secret to creating a multitiered wedding cake is staying organized and giving yourself plenty of time. Start by baking your layers in advance and letting them cool completely, as well as the Vanilla Simple Syrup, before you assemble. Use a serrated knife to level the cakes so they can stack evenly. Then soak a layer with Vanilla Simple Syrup to keep the cake moist, and add the Strawberry Cream Filling. Once your layers are stacked, spread a light coat of buttercream over the entire cake, pop it in the fridge to set, and finish with a smooth final layer of buttercream.
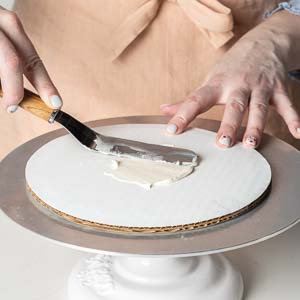
Level cake layers to make each cake 1½ to 2 inches tall and flat. Place a 12-inch layer on a 14-inch silver wrapped cake drum or a 16- to 18-inch cake plate/stand, using a small amount of buttercream to secure it to the board. If the cake needs to sit on a smaller board for space or to transport, build it onto a 12-inch board instead.
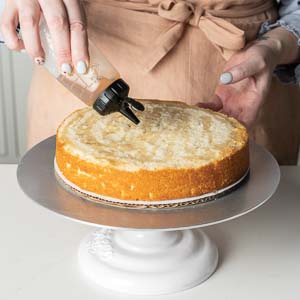
 Pour Vanilla Simple Syrup into a squeeze bottle, and generously soak cake layer.
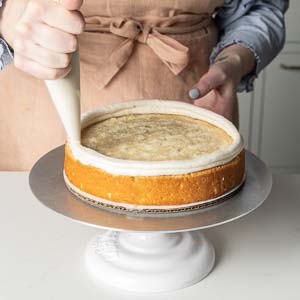
 Spoon buttercream into a pastry bag, and cut a 1⁄2-inch opening in tip. Pipe a border of buttercream around edge of cake layer. Spoon 3 cups (645 grams) Strawberry Cream Filling onto cake layer, and spread within border. Repeat with second cake layer, soaking layer with syrup and topping with remaining filling. Top with final 12-inch cake layer. Using a level each time you add a layer of cake ensures your tiers align perfectly and your cake remains steady.
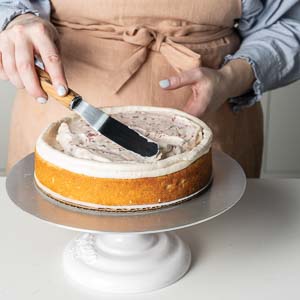
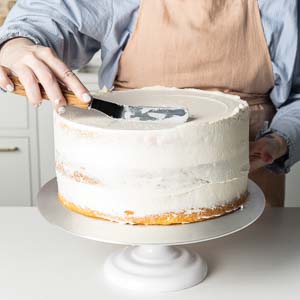
 Spread a thin layer of buttercream on top and sides of cake, scraping off excess. Refrigerate until frosting is set, at least 20 minutes. The first light layer of buttercream, known as the crumb coat, is applied to a cake before the final, smooth finish. It’s not about perfection—it’s about creating a base that locks in loose crumbs and provides a clean surface to work with.
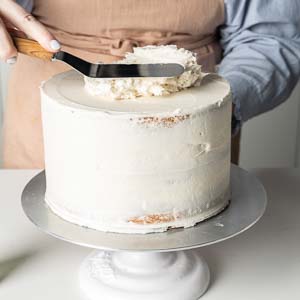
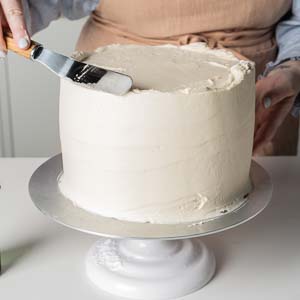
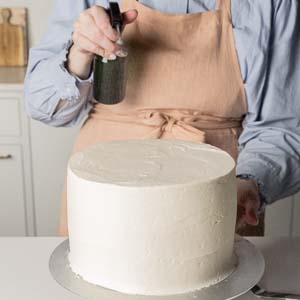
 Remove 12-inch cake from refrigerator. Spread buttercream on top and sides of cake, using an offset spatula or bench scraper to smooth. At this stage, a light mist of water from a spray bottle helps the offset spatula or bench scraper glide smoothly over the surface, leaving you with a perfectly smooth, flawless finish.
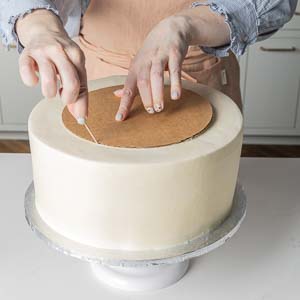
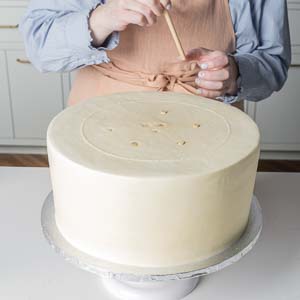
Mark center of 12-inch cake with a 9-inch cake board. Using a wooden pick, score perimeter of cake board. Insert a wooden dowel into center of 12-inch cake, and mark where dowel meets buttercream. Remove dowel, and use as a guide to cut remaining dowels to same length.
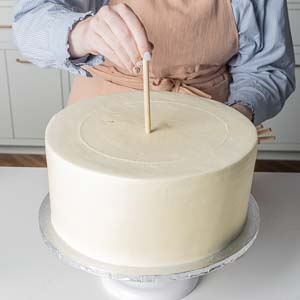
Insert 3 prepared dowels about 1 inch apart from each other in very center of 12-inch cake. Arrange remaining 6 dowels equidistant around center, about 2 inches away from scored circle. Return cake to refrigerator to set.
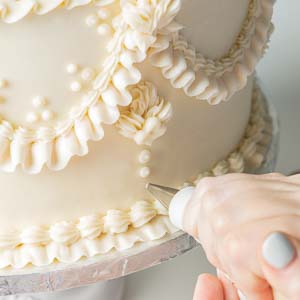
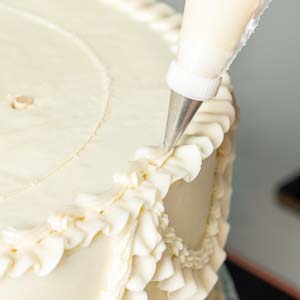
Using frosting reserved for decoration, pipe designs on outside of cake layers as desired. When not decorating, keep cake layers refrigerated.
 Place 12-inch cake tier, with cake board, on desired cake plate. Stack 9-inch and 6-inch tiers, with the boards they are on, on top. Let cake stand at room temperature for at least 1 hour before serving.
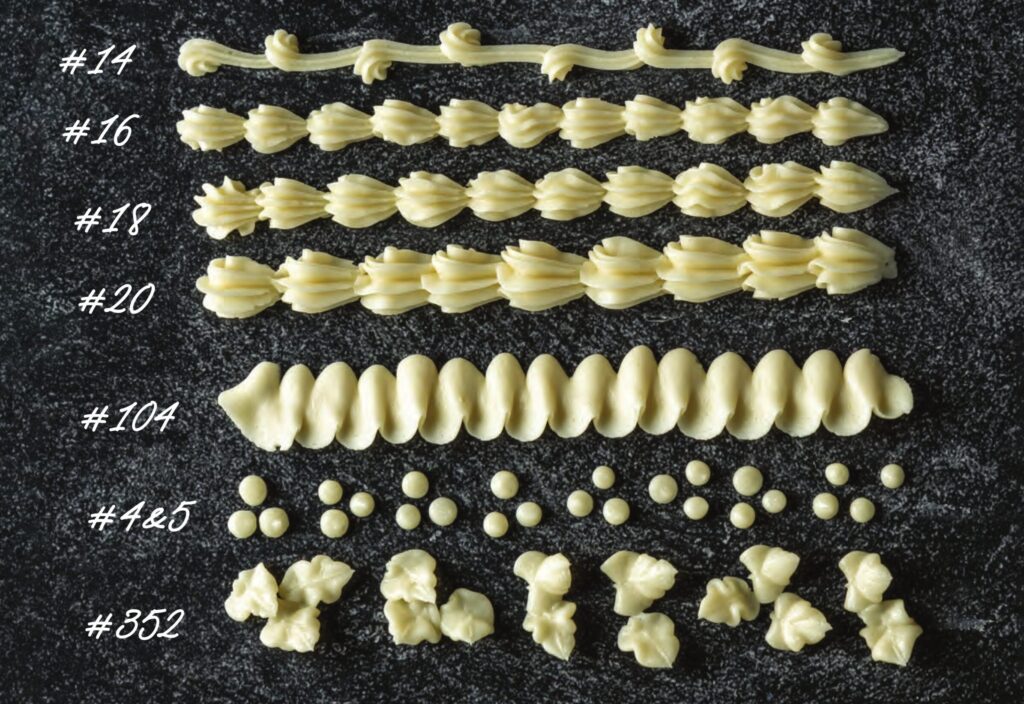
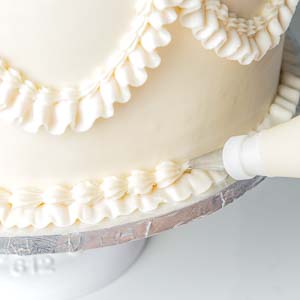
Whether you’re adding delicate shell borders or bold, ruffled edges, each piping tip has its specialty, and knowing when to use them can elevate your cake decorating.
A coupler is essential for this process; it lets you switch between tips without wasting buttercream, making it indispensable for multitiered creations with an array of designs.
Use Wilton Nos. 14, 16, 18, and 20 for elegant shell details with clean edges. For precise, detailed piping, Wilton Nos. 4 and 5 are small enough to add intricate touches in tight spaces. For ruffled edges, Wilton No. 104 is the go-to. Use Wilton No. 352 to create textured leaf patterns.
Follow along and you’ll have a masterpiece that’s piped to perfection
CHILL YOUR CAKE LAYERS: Before you start piping, make sure your cake layers are fully chilled (but not frozen). This makes it easier to handle the cake and helps the buttercream stay firm and smooth as you pipe. Cold cakes are much less likely to shift or crumble, providing a stable base for your design.
CONSISTENCY IS KEY: The consistency of your buttercream can make or break your piping results. Before decorating, test the buttercream on a piece of parchment paper to ensure it’s smooth, easy to pipe, and firm enough to hold its shape. If the buttercream is too aerated, fold with a rubber spatula to pop air bubbles or gently tap the bowl on the countertop to release bubbles. These bubbles can cause issues when piping and create an uneven final coat. When you’re ready to start, hold your pastry bag at a 45-degree angle to the cake’s surface. This allows for even pressure, ensuring smooth and consistent lines. Gentle pressure and steady, fluid movements will give your piping those clean, sharp edges.
PIPING ON THE CAKE: When piping around the sides of the cake, start at the bottom and work your way up to create neat, symmetrical rows. Gently squeeze your pastry bag, lift it slightly to form each dot or rosette, and ensure a slight overlap to make each design flow seamlessly. For a flawless finish, use a lightly dampened fingertip or paintbrush to press down any peaks on dots or other designs. And an arc ruler can be a game changer—rest it against the cake’s surface to create small indentations that you can then pipe your design onto with precision.

STAY CALM: No matter how perfect your technique, it’s important to stay calm and enjoy the process. If a line isn’t exactly as you envisioned, use a small offset spatula to smooth it out. If the buttercream starts to soften or you feel rushed, don’t hesitate to pop the cake back into the fridge for a quick chill. The more relaxed you are, the more fluid and natural your piping will be.
DON’T OVERFILL YOUR PASTRY BAG: A common mistake is overfilling your pastry bag, which can make it difficult to control the flow and result in uneven pressure and messes. Fill your pastry bag about two- thirds full (or just halfway for even more control!) to allow the frosting to move freely while still giving you the precision you need. Twist the top of the bag tightly to maintain steady pressure as you pipe, ensuring each swirl and line turns out just as you intended.
PRACTICE FIRST: Don’t forget to practice before tackling your cake. Spend a few minutes familiarizing yourself with the pastry bag on a piece of parchment paper or a spare plate. This will help you get a feel for how the frosting flows, the pressure needed for different designs, and how each piping tip behaves. With a little preparation and patience, you’ll pipe with confidence and create a cake that’s beautiful.
The post Baking School In-Depth: Strawberries and Cream Wedding Cake first appeared on Bake from Scratch.