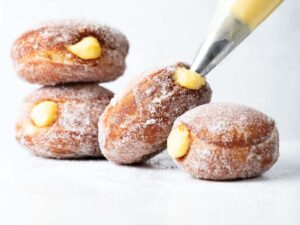
Malasadas

I first encountered malasadas in Hawai‘i, though their story starts far from the Pacific, on the other side of the world, in Portugal. Brought to the island chain by Portuguese immigrants, malasadas were a taste of their home in a new land. And in a place where the air hums with the scent of tropical fruit and the ocean stretches into eternity, malasadas took on a new identity.
 
Malasadas’ history stretches back centuries. Their name is thought to come from the Portuguese words “mal” (meaning “bad”) and “assado” (meaning “roasted” or “baked”), likely a reference to their freeform shape rather than their taste. They were originally a treat made in convents, where Portuguese nuns perfected the art of egg-rich doughs and sugar-coated confections. Over time, malasadas became a staple in Portuguese households, especially for festive occasions and pre-Lenten celebrations.
 
Beginning in the 1870s, thousands of Portuguese immigrants from the Azores and Madeira traveled to Hawai‘i to work on sugarcane plantations. They brought their culture, their traditions, and, of course, their food. Malasadas quickly became a beloved treat within the islands, particularly within the larger Portuguese community. Over time, local bakeries, most notably Leonard’s Bakery, helped popularize them among a broader audience, making them an essential part of Hawaiian food culture. They evolved throughout generations to incorporate local flavors such as haupia (creamy coconut filling), liliko‘i (passion fruit), and guava, solidifying their place as a cherished island tradition.
Malasadas
Malasadas aren’t shaped like ring doughnuts. They’re plump and golden, slightly irregular, each one with its own personality. They puff up in hot oil, turning bronzed and crisp before being dredged, still warm, in sugar. When you take a bite, the outside has a slight crunch before giving way to an impossibly soft interior—pillowy, buttery, rich with eggs and milk.
 
Traditionally, malasadas were made to use up butter and lard before Lent, a final indulgence before the austerity of the season. That’s why Malasada Day is celebrated on Shrove Tuesday in Hawai‘i, where they’ve become as much a part of the local culture as poke or shaved ice. In homes and bakeries across the islands, people line up for a dozen or more, each one still warm from the fryer, some dusted in cinnamon sugar, others filled with vanilla custard, passion fruit cream, or haupia.
 
The first time I ate a malasada, I was standing outside Leonard’s Bakery in Honolulu, the scent of sugar and fried dough thick in the air. I had ordered the classic—no filling, just sugar—and when I bit in, it was so soft, so impossibly airy, that I stood there stunned, the warm dough dissolving on my tongue. It tasted of childhood and carnival treats, of mornings when the world feels gentle and full of promise. I finished it and immediately wanted another.
 
Making malasadas at home is a process, but a joyful one. The dough is enriched with eggs, butter, and milk and then left to rise until it’s light and airy. Some versions include a touch of citrus zest or rum, a nod to their Portuguese origins. Once risen, the dough is shaped—sometimes into rounds, sometimes into slightly flattened pieces—and then fried until golden. The moment they come out of the oil, they’re tumbled into sugar, the granules clinging to the hot surface, forming that essential, delicate crunch.
 
The first bite is always the best—the crisp exterior giving way to the soft interior makes malasadas irresistible. And while the traditional sugar-coated ones are perfection on their own, the filled versions are something else entirely. Silky pastry cream oozes from the center, sometimes flecked with vanilla bean seeds, sometimes tangy with tropical fruit. The richness of the dough, the cool smoothness of the filling—it’s the kind of contrast that makes you close your eyes for just a second longer.
 
Across the world, you’ll find variations: pączki in Poland, Berliners in Germany, bomboloni in Italy. But malasadas, with their roots in Portugal and their spirit in Hawai‘i, feel like something extra special. They are indulgent but never heavy, sweet but not cloying, familiar yet transportive.
 
When I crave a taste of sunshine, especially on dull days, I make malasadas. The process of mixing the dough and letting it rise promises that soon enough, there will be warm, golden treats to dredge in sugar and enjoy while still hot. These pastries remind me that food can be a source of joy; sometimes, the simplest ingredients—a bit of dough, a little sugar—bring the greatest pleasure. Isn’t that what we all need? A reminder of warmth and sweetness, the kind of food that makes you close your eyes and smile. Malasadas are just like that—sunshine in edible form.
Malasadas
Print

Malasadas

Makes 12 to 14 doughnuts
Malasadas, a beloved treat in Hawai‘i, are golden, fried doughnuts that embody both indulgence and cultural heritage. Their origins trace back to Portuguese immigrants who brought the recipe to the islands, where the locals adapted it into the version we now cherish. The secret to achieving the perfect malasada lies in the technique of gradually incorporating softened butter into the dough. Adding the butter one piece at a time creates a smooth, elastic dough that fries up to a delicate balance of crispness on the outside and a light, airy interior. Another key ingredient is evaporated milk, which imparts a rich, slightly caramelized flavor to the dough and contributes to its tender texture. Refrigerating the dough overnight allows its flavor to develop, enhancing its complexity. The optional coconut extract in the dough amplifies that tropical essence beautifully along with the velvety Haupia Filling—a silky coconut custard that elevates the entire pastry. While the frying process may seem intimidating, using parchment paper to lower the dough into the hot oil ensures they keep their shape and fry evenly. The result? Malasadas that are golden, crisp, indulgent, and transport you straight to the islands.

Ingredients

  • 1 cup (240 grams) warm evaporated milk (105°F/41°C to 110°F/43°C)
  • 1 (0.25-ounce) package (7 grams) active dry yeast*
  • ½ cup (100 grams) plus 1 teaspoon (4 grams) granulated sugar, divided, plus more for coating
  • 3⅔ cups (458 grams) all-purpose flour, plus more for dusting
  • 1 teaspoon (3 grams) kosher salt
  • 1 large egg (50 grams), room temperature
  • 1 large egg yolk (19 grams), room temperature
  • 1 tablespoon (13 grams) vanilla extract
  • ¼ teaspoon (1 gram) coconut extract (optional)
  • cup (76 grams) unsalted butter, cubed and softened
  • Vegetable oil, for frying
  • Haupia Filling (recipe follows)

Instructions

  • In a small bowl, stir together warm milk, yeast, and 1 teaspoon (4 grams) sugar until well combined. Cover and let stand until foamy, about 10 minutes.
  • In the bowl of a stand mixer, whisk together 2 cups (250 grams) flour, salt, and remaining ½ cup (100 grams) sugar by hand. Add yeast mixture; using the paddle attachment, beat at low speed until combined. Add egg, egg yolk, vanilla, and coconut extract (if using), beating until combined. With mixer on low speed, gradually add remaining 1⅔ cups (208 grams) flour, beating just until dough comes together and stopping to scrape paddle and bottom and sides of bowl.
  • Switch to the dough hook attachment. With mixer on low speed, add butter, one cube at a time, beating until combined after each addition. Beat until dough is elastic and smooth, 8 to 10 minutes.
  • Spray a large bowl with baking spray. Place dough in bowl, turning to grease top. Cover and refrigerate overnight. (Alternatively, cover and let rise in a warm, draft-free place [75°F/24°C] until doubled in size, 2 to 3 hours.)
  • Spray baking sheets with cooking spray. Cut 14 (5-inch) squares of parchment paper, and place on prepared pans.
  • Turn out dough onto a lightly floured surface, and roll to ½-inch thickness. Using a 3x2½-inch oval or 3-inch round cutter dipped in flour, cut dough. Gently transfer cut dough to prepared parchment squares, spacing at least 2 inches apart.
  • Reroll scraps; let dough stand for 10 minutes. Cut dough, and place on prepared parchment squares. (Discard any remaining dough scraps.) Cover with plastic wrap, and let rise in a warm, draft-free place (75°F/24°C) until puffed, about 1 hour (or about 1½ hours if your dough was previously refrigerated).
  • In a 4- to 6-quart cast-iron Dutch oven or other large heavy-bottomed saucepan, pour oil to a depth of 2 inches, and heat over medium heat until a deep-fry thermometer registers 350°F (180°C). Line a rimmed baking sheet with paper towels.
  • Using parchment paper to pick up doughnuts, transfer doughnuts in batches of 2 to 3 to hot oil, letting doughnuts gently fall off parchment into oil. (Do not place parchment paper in oil.) Fry doughnuts in batches until golden brown, 1 to 2 minutes per side. Remove doughnuts from oil using a spider strainer or slotted spoon, and let drain on prepared pan. Dredge warm doughnuts in sugar to coat.
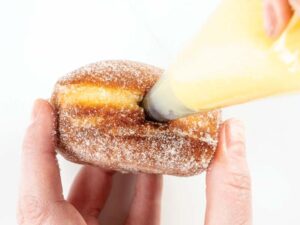
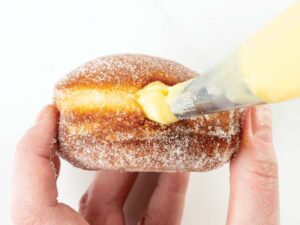
  • Spoon Haupia Filling into a pastry bag fitted with a medium round piping tip (Ateco #803).
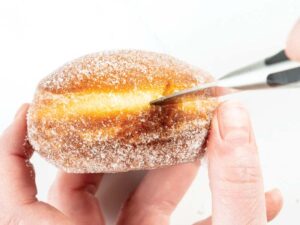
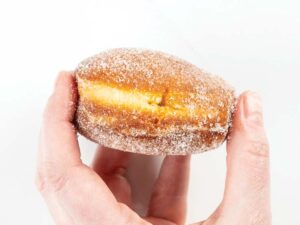
  • Using a small paring knife, create a hole in the side of each doughnut; add Haupia Filling as desired. Best served same day as made. Refrigerate in an airtight container for up to 2 days.

Notes

*We used Red Star® Active Dry Yeast.
Print

Haupia Filling

Makes 2 cups

Ingredients

  • 1 cup (240 grams) whole milk
  • ½ cup (120 grams) canned unsweetened coconut milk
  • ½ cup (100 grams) granulated sugar, divided
  • 4 large egg yolks (74 grams)
  • tablespoons (26 grams) cornstarch
  • teaspoon kosher salt
  • teaspoons (6 grams) vanilla extract
  • teaspoon coconut extract
  • 2 tablespoons (28 grams) unsalted butter, softened

Instructions

  • In a medium saucepan, heat milks and ¼ cup (50 grams) sugar over medium heat, whisking frequently, until steaming. (Do not boil.)
  • In a medium bowl, whisk together egg yolks, cornstarch, salt, and remaining ¼ cup (50 grams) sugar. Gradually add hot milk mixture, whisking constantly. Pour egg yolk mixture into saucepan; cook over medium heat, whisking constantly, until thickened and bubbly, 4 to 5 minutes. Whisk in extracts.
  • Strain mixture through a fine-mesh sieve into a large bowl. Whisk in butter until melted and well combined. Cover with plastic wrap, pressing wrap directly onto surface of pastry cream to prevent a skin from forming. Refrigerate until an instant-read thermometer registers 65°F (18°C) to 70°F (21°C) before using, 2½ to 3 hours.

Notes

PRO TIP: Give your canned coconut milk a good shake before measuring.

Cutting malasada Cutting malasadas
Cut malasada Putting filling in malasada

Adding filling into malasada

The post Malasadas first appeared on Bake from Scratch.